

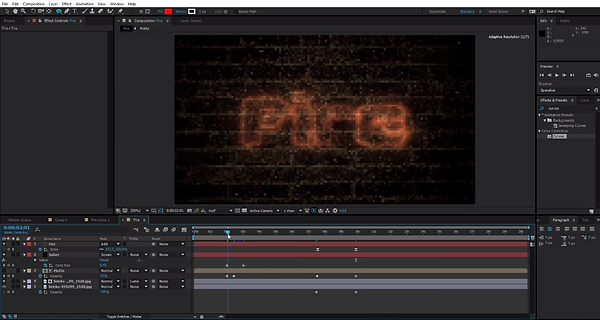
How to Create Some Burning Text - Tutorial
Start by creating a new text. I typed in Fire. Choose the font you want. I used the AR DESTINE font. Scale and position your text right. Also use the Pan From Behind tool to place the Anchor Point to the text to the middle.

Then create a new black Solid. I called mine for Saber. Apply the Saber effect to it. Choose the Fire preset. Then go to the Core Distortion tab under the Distortion tab.

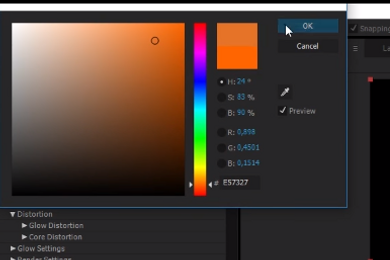
Set the Distortion Amount to 40. Then choose a color for the effect. I choose this one:
Open the Customize Core tab and set the Core Type to Text Layer. Then set the text layer to the text you have (Mine is Fire). Then drag your text layer to the top of your composition and set the blending mode to Add. Then drag in your background layer. If you are using the image that I am using, apply the curves effect to it and twist it like this:

Then duplicate it. Take the bottom one and reset the Curves effect. Then twist it like this:

Then create a new Black Solid. Use the Ellipse tool to create an ellipse around it like this:

Then invert the mask by clicking on Invert. Set the Feather to 400 and the Mask Expansion to -70. Then create a new White Solid. Put it underneath the Black Solid. Then Pre-Compose the black and the white solid. I called the pre-comp for Matte. Then put it over the two background layers. On the top background layer, set the Track Matte mode to Luma.

Then set the Blending Mode of the Saber layer to Screen. Jump forwards three seconds and set a keyframe for the Core Size on the Saber effect. Then go to the two second mark and set the Core Size to 0. Go to the two second mark and set a keyframe for the Opacity on your text layer. Set it to 0%. Then go the 2 ¾ mark on your timeline and set the Opacity to 100%.

Then take the 0% Opacity keyframe and smooth it by hitting F9. Go to the two second mark and set a keyframe for the Opacity on the Matte layer. Also set it to 0%. Then go to the 2 ½ second mark and set the Opacity to 100%. Go to the seven second mark and set a keyframe for the Opacity for the Matte layer and the bottom background layer. Then go to the ten second mark and set the Opacity for the Matte layer and the bottom background layer to 0%. Also set a keyframe for the scale on the seven second mark on the text layer. Then go to the ten second mark and set the Scale to 137%. Choose both of the keyframes and hit F9.
So thats it. I hope you liked the tutorial. If you wanna take the tutorial offline you can download it by clicking on the button below.
VFXcreate Studios ©
Click here to download the tutorial.